This fursuit cooling ventilator system project was made possible in collaboration with Singapore Fursuit maker Animagus Fursuits, who created the fursuit head, handpaws and feetpaws. https://animagusfursuits.wixsite.com/mystikreatures

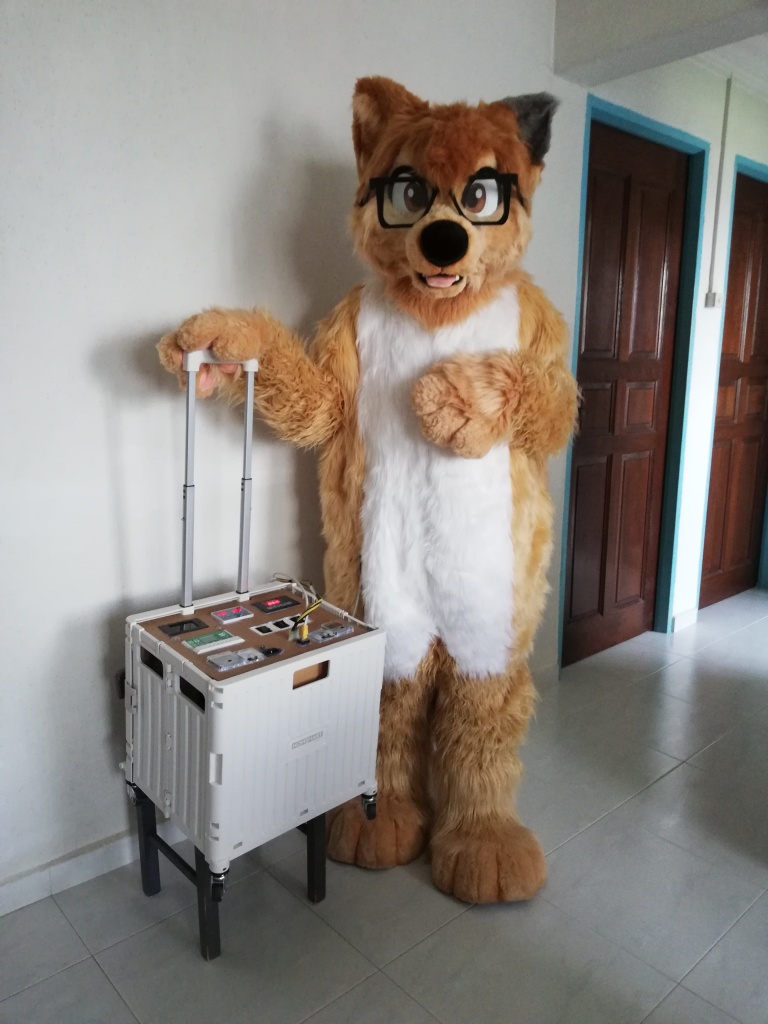
Picture 1: Here’s the current prototype in action at a convention in the year 2022. Thanks to Pawsry for being my handler. (Check out his Global Furry Television YouTube channel). Photo by Rileycosine.
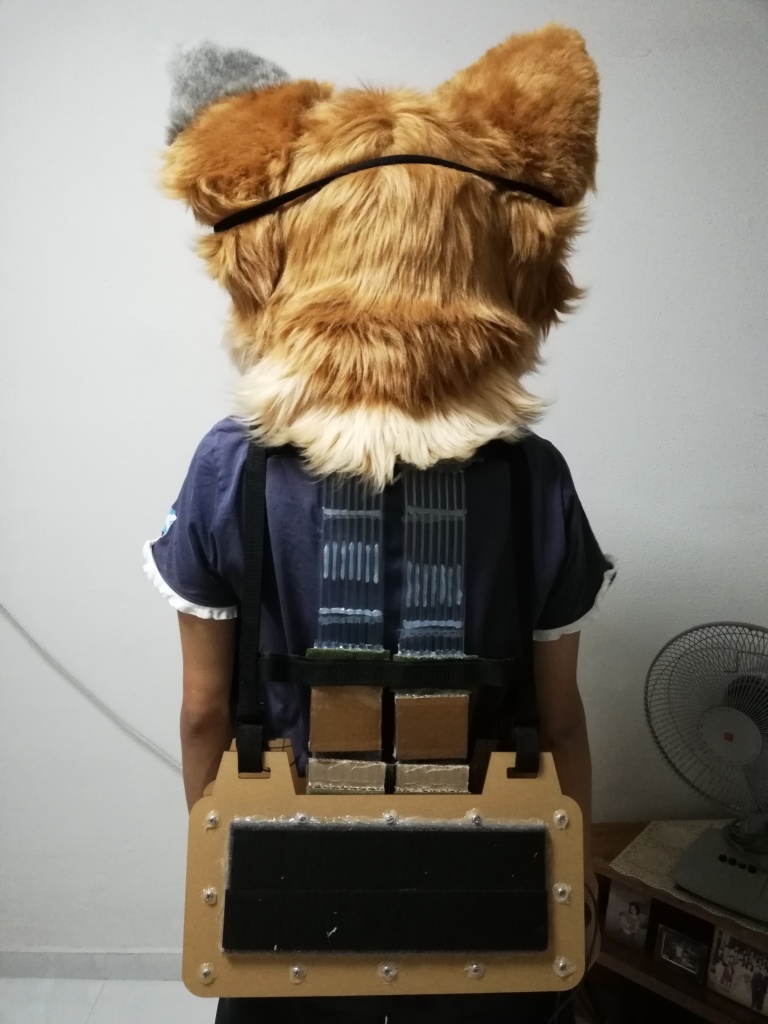
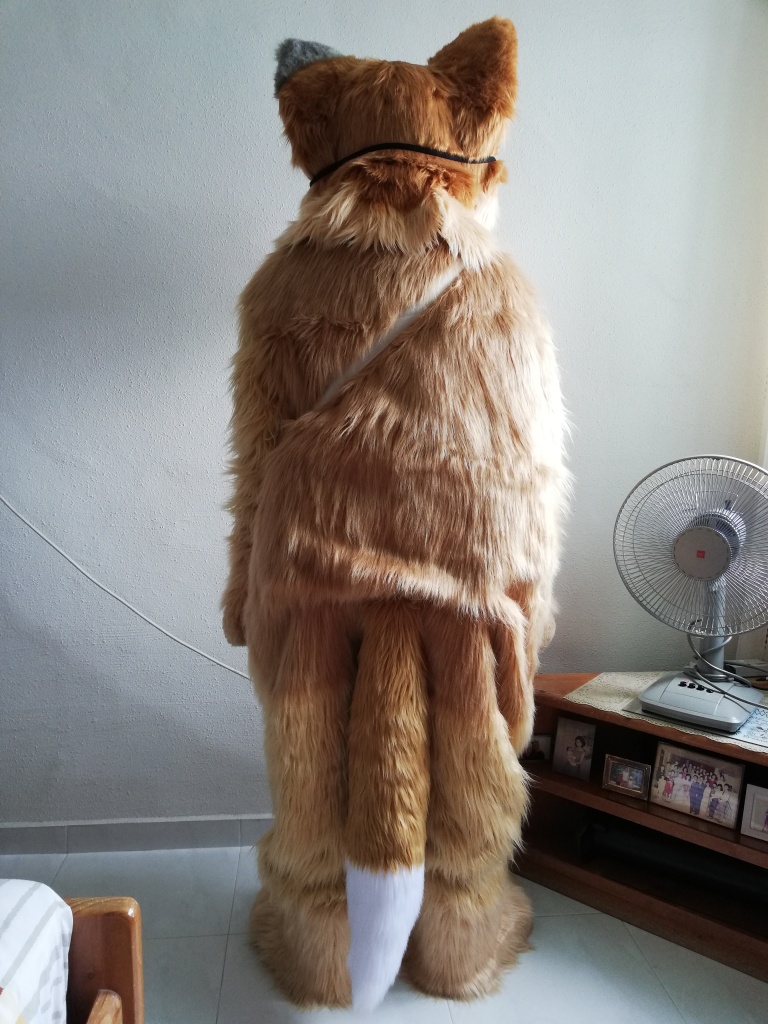
Picture 2: The current prototype as of the most recent update for this post. (Note that the trolley is usually rolled around on the floor. I had placed it up on a chair for better viewing.)
Introduction
The idea of building something to help reduce the risk of heat injury for fursuiters, or mascot costumed performers in general, came to mind many years ago when I read about the moderate to high risk of heat injury that many fursuiters faced. The desire to build this project was inspired by the need to address the serious health risk of heat injury that suit and costume wearing performers (suiters) face.
Growing up, I became a hands-on person by circumstances, and I enjoyed tinkering with things to see how they worked, while trying to produce do it yourself solutions to problems I encountered. With this mindset, I took this opportunity to tackle the problem of staying cool and dry in fursuit.
Problem
The main problem faced by fursuiters is the gradual buildup of heat inside their suits, which very often cannot be easily dissipated depending on the type and amount of suit construction materials used. This problem is more serious with full suits than with partial suits since the whole body is covered in the former. Our bodies have an excellent mechanism for increasing the rate of dissipating body heat through perspiration.
The evaporation of water from the surface of our skin helps to remove heat from our bodies. However, the closed and padded nature of a fursuit’s materials make it difficult for the humidity built up inside a suit to dissipate properly. With high levels of humidity, prespiration is not able to evaporate as quickly and the suiter’s body cannot cool off as quickly as it needs to.
This vicious build-up of heat and humidity is dangerous to the health of the suiter. Left unmonitored, this can result in heat injury or worse. This problem is further exaggerated by Singapore’s warm and humid climate. Additionally, the build-up of body odours within the suit in the process is also unhygienic to the suiter.
Furthermore, I live in Singapore, a country next to the equator, where our climate is warm and humid all year round. The above-mentioned factors combined with environmental conditions I face here in Singapore all further aggravate the risk of heat injury posed to suiters.
Concepts
I took inspiration from our human body’s natural mechanism of dissipating heat – perspiration. You know that feeling when you stand in front of a fan on a hot day, or after exercising? The airflow helps to cool off most of your body at once and does so effectively. I aimed to achieve a similar effect with this project.
The principle behind the whole concept of staying cool inside the fursuit was centered around the law of conservation of energy. For the suiter’s body to remain at a constant temperature, the cooling system would have to expel heat from the inside of a fursuit at the same rate that the suiter’s body produces heat.
To cool the inside of a fursuit below room temperature, the system would have to expel heat from the inside of the fursuit at a faster rate than the suiter’s body produces heat. The level of heat being produced by the suiter’s body will also vary throughout the duration of fursuiting, as the suiter can become excited or tired.
Similarly, when trying to remove humidity from the inside of a fursuit, the system has to be able to dissipate humidity faster than it can accumulate, so that the suiter’s prespiration can evaporate quickly and provide effective cooling to their bodies.
I considered various solutions that would be able to achieve both tasks effectively, and ultimately settled for one that involved circulating air throughout the fursuit, reaching as many areas of the body as possible. Concurrently, I also realized that having a constantly flowing supply of air into and out of the suit would prevent the buildup of body odours for a more hygienic and pleasant fursuiting experience.
Limitations of Existing Solutions
There are current solutions for tackling this problem of heat buildup in fursuits, most notably a body cooling vest that makes use of cooling gel packs. However, some notable limitations of these cooling vests include:
- Localized cooling to only specific parts of the body.
- May result in cold spots while other portions of the body remain warm.
- Does not remove or prevent humidity buildup due to prespiration.
- Does not remove or prevent odour buildup due to prespiration.
- Cooling does not extend to the suiter’s limbs or head.
- Suiter cannot control the extent of cooling.
- Becomes an additional layer of insulation when the cooling packs are exhausted during fursuiting.
- Need to remove bodysuit before being able to remove cooling vest.
- Need to have freezer/icebox or purchase icepacks beforehand or during fursuiting for changing of cooling packs.
Preliminary Idea

Picture 3: A sketch of one of my earliest ideas is shown below, and this design has still mostly stuck all the way to the first prototype, with some improvements.
The sketch seen in the picture above depicts how a prototype ventilation system is supposed to draw air from a fursuiter’s surrounding environment, then inject it into the lower back of the fursuit. From the lower back, this air can then propagate to the different parts of the body using a series of tubes or through the suiter’s own actions.
The Fan System
I searched for a low-profile fan that could deliver both high pressure and high airflow rates. Conventional cooling fans would not have worked since their intake and exhaust openings were extremely large and could not be feasibly installed into a fursuit without leaving a gaping and unaesthetic mesh hole on the back.
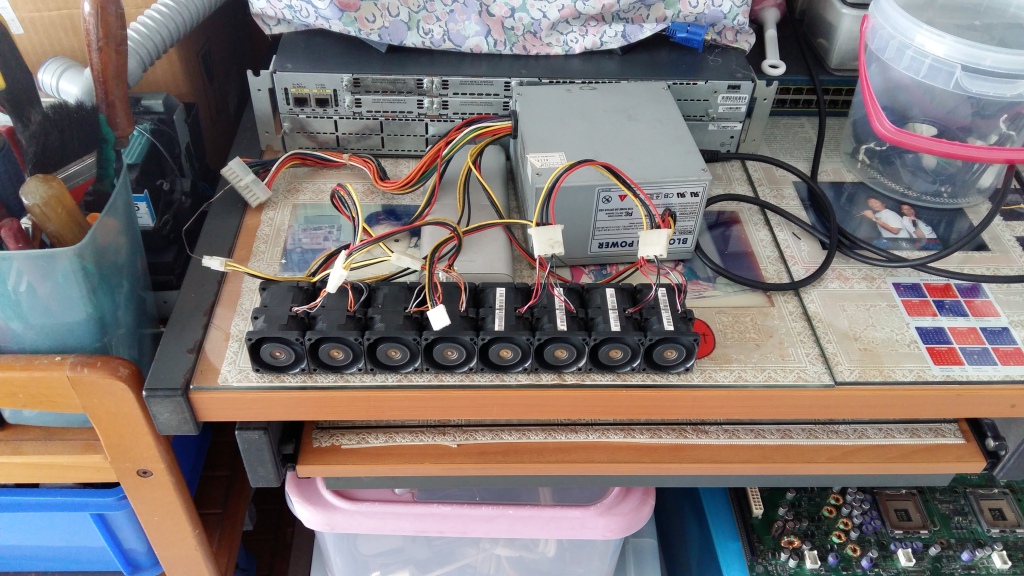
I eventually stumbled across them in a discarded rack server computer machine. Although the machine was no longer functional, the fans inside them still were. Each of these fans came in pairs, with their intake and exhaust openings having a length and width of 4 centimeters.
Each pair of fans had a unique design consisting of two rotors. Each rotor had a different number of fan blades that were shaped differently, and both rotors spun in opposite directions with rotational speeds of up to 10,000 RPM. Since they were designed to cool densely packed electronic equipment, they could deliver both the high air pressure and flow rates that I was searching for.
Furthermore, such fans are often known to be more robust since they are meant to run 24/7 for many years on end under heavy loads in such servers. Hence, they would be more reliable and less prone to failure while installed in the fursuit ventilator module.

Picture 4: The rack server containing the 8 low profile pairs of fans, highlighted in the red box.
Assembly of Ventilation Module
The ventilation module prototype I proceeded to build seeks to address the above-mentioned concerns for the prevention of heat injury to suiters. It starts with the salvaging, testing and reassembly of those low-profile fans from the rack server into the necessary series parallel circuit configuration for proper operation.
Each pair of fans is tightly coupled together as a single unit and operates at 12 volts. I then attached two pairs together in series, such that they could operate at 24 volts. The 4 pairs of pairs were finally attached in parallel. This means that the array of fans can operate with a voltage of up to 24 volts. However, the optimal operating voltage was found to be between 6 and 18 volts.
Operating at 6 volts is the minimum voltage required for the fans to start spinning and delivering any airflow. 18 volts in the recommended maximum, beyond which, the battery would drain very rapidly and the fans become very noisy during use.
Picture 5: A test run being conducted on all 8 pairs of fans before assembly into the ventilation module.
The fan array was then lined together in a row and sandwiched between two custom cut acrylic panels. The shape and size of these panels were custom cut to allow them to hold all components in place, while providing a means to mount harness straps. They were also constructed with rounded edges to prevent any abrasions to the wearer or tearing of the bodysuit.
The electrical wiring was sealed within, and layers of foam were added between each acrylic panel and the fans to act as vibration dampeners when the fans are operating. A grill was installed on the intake and exhaust openings for all the fans to prevent objects from coming into contact with the spinning blades. Hot glue was further used to secure any other points which could come loose during use.
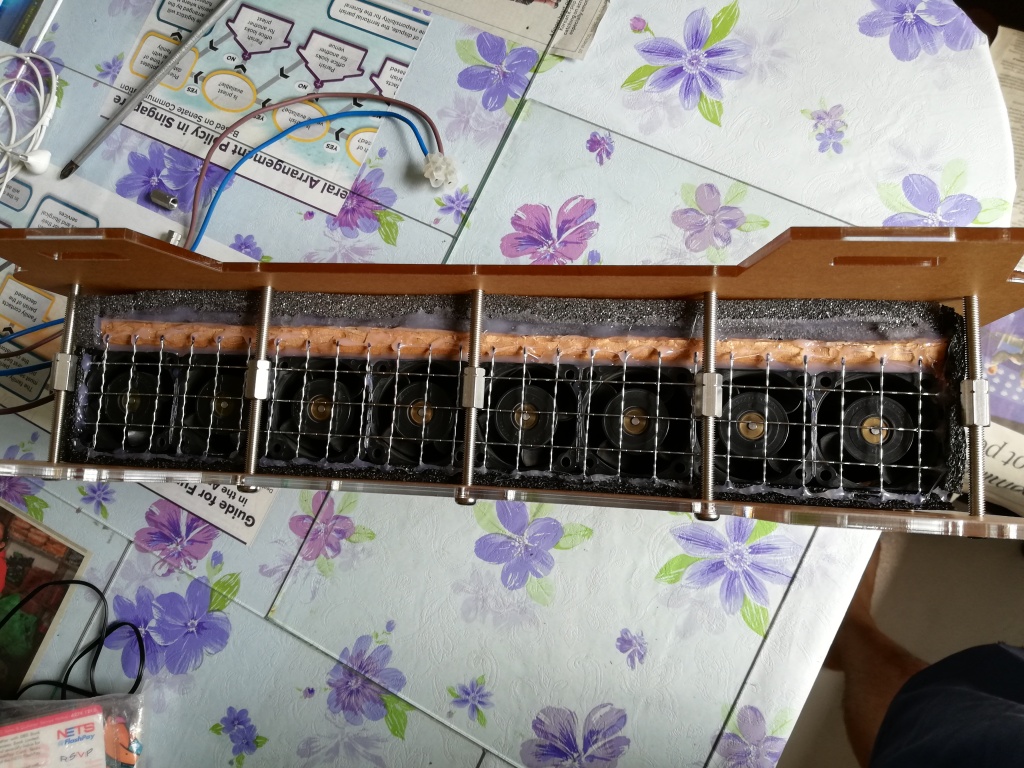
Picture 6: The 8 pairs of fans, wired up and assembled between two acrylic panels, held together with 2-way nuts and bolts.
Mounting System and Harness
Aside from the fans, there were other aspects of the ventilator module to consider. The first was to decide on the location of the body where the ventilator should be mounted. The lower back was chosen as it would give the least hindrance to the fursuiter while still being able to be worn like a bag pack and direct air to most of the suiter’s body for cooling. The entire unit would have to be held together with some kind of chassis that had to be lightweight yet strong. I chose to go with a sufficiently thick arcylic panel seeing how it was easier to commission from a vendor.

Picture 7: The design of the acrylic panel chassis. Each letter represents a specific measurement value, while coloured regions represent holes.
The first was to devise a mounting system that could hold everything together and be worn by a suiter with ease across the suit’s body and head regions. It should be flexible enough to allow for sufficient movement without easily coming apart. The ventilator is worn using two bag pack straps that act as a harness and allow the suiter to carry its weight, while the harness should be adjustable to adapt to the height of the suiter.
The second was to incorporate it into the body of a suit such that it would not significantly change the suit’s appearance too much. The ventilator module was constructed with a low-profile structure so that it does not protrude out from the back of the suit too much and can be concealed partially beneath the layer of faux fur. Concurrently, it should be easy for the ventilator to be firmly mounted within the suit while still being easy for the suiter to dismount it for cleaning.
The third was to ensure proper airflow and aerodynamics within the suit to deliver the required performance and comfort in terms of cooling, ventilation, comfort, and hygiene. Air would be drawn in from the surroundings outside the suit, flushed through the suit once and then expelled, without being recycled internally. Airflow should cover key regions of the body which generate the most heat to be most effective. This would be achieved through the construction of the bodysuit.
Flexible rubber tubes branching out from the top of the ventilator were used to deliver a portion of the incoming air into the suiter’s head to provide cooling for that region. Carboard cut out mounts were hot glued onto portions of the ventilator and air delivery tubes for stability. They tuck comfortably into the back of the suiter’s head to flush air in. Some experimentation was done to determine the feasibility of using tubes to deliver air to the upper limbs, but this ultimately did not work.
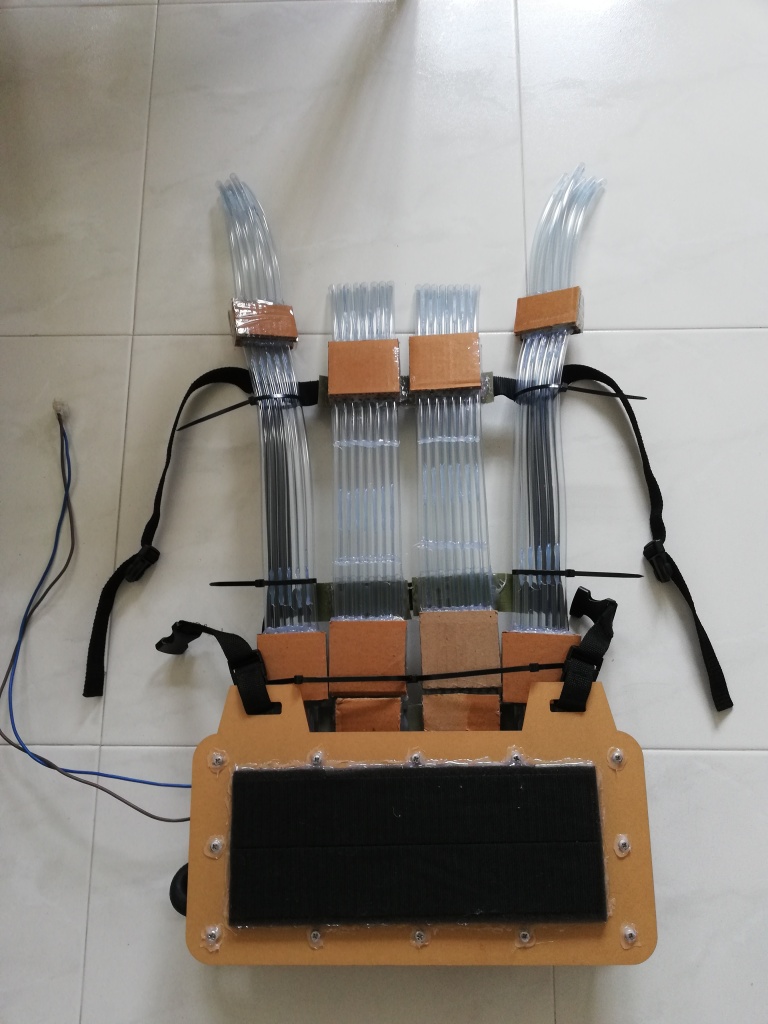
Picture 8: The standalone ventilation module. The protruding tubes stick into the fursuit head to deliver a constant supply of air into it for cooling and ventilation. (Note that some aspects of this early prototype were changed in subsequent revisions.)
Modularity
Since this ventilator is still in the prototyping stage, there will be a need to make some modifications and improvements to the ventilation module. As such, the various components of the ventilation module will need to be easily removable for purposes such as cleaning, servicing, repairs or upgrading.
To realize this concept, I made use of quick disconnect bag pack clips for the harness and a Velcro mounting strategy for the tubes. Large Velcro patches were also attached to the front and back sides of the ventilator so that it could be firmly Velcro mounted to the bodysuit itself.

Picture 9: The various components of the ventilator module can be disassembled for cleaning, servicing, adjustments, or upgrades. This modular nature allows for future customization as required.
Rear View Appearance
Picture 10: The rear view of the ventilator module when worn without a bodysuit. The plastic tubes help to deliver a portion of the air from the ventilator into the fursuit head.
Bodysuit Construction (Inner Layer)
Creation of the bodysuit was not done in the traditional way using a duct tape dummy. Because of the ventilator module mounted at the owner’s lower back, the total length of the fabric used along the suiter’s back would have to be longer to accommodate its installation. The bodysuit itself would also have to be significantly larger than the owner’s body so that it would be baggy. This bagginess of the suit provides space for air to circulate inside the bodysuit effectively. Therefore, I used a standard onesie that fit me well as a baseline for measuring the shape and size of my bodysuit.
The ventilator is firmly mounted to the lower back of the body portion of the suit using large Velcro patches. Fresh air is drawn in from the outside of the suit through a subtle opening on the lower back. The Velcro patches are positioned in a manner at closes off most of the gaps between the ventilator module and the fabric to create a partially airtight seal, ensures that cooler and dryer air is properly drawn in from the outside during operation. By using Velcro patches, the suiter can easily dismount and remount the ventilator while being able to adjust its exact position in the suit.
The air is then flushed into the suit, and strategically redirected to the head and limbs and chest areas. This provides sufficient cooling for key hotspots around the suiter’s body and head, while also ventilating most regions of the body for drying perspiration and removing as much humidity and odours as possible. Furthermore, the suiter can also adjust the rate of airflow to the different parts of their body through assuming specific body positions while inside the suit.
Since this ventilator draws in air from the surroundings outside the suit, the optimal surrounding environment would be an air conditioned one where the air is already cooler and less humid than it would be outdoors. This allows for greater rate of cooling and drying of perspiration due to the steeper differences between temperature and humidity inside and outside of the suit.
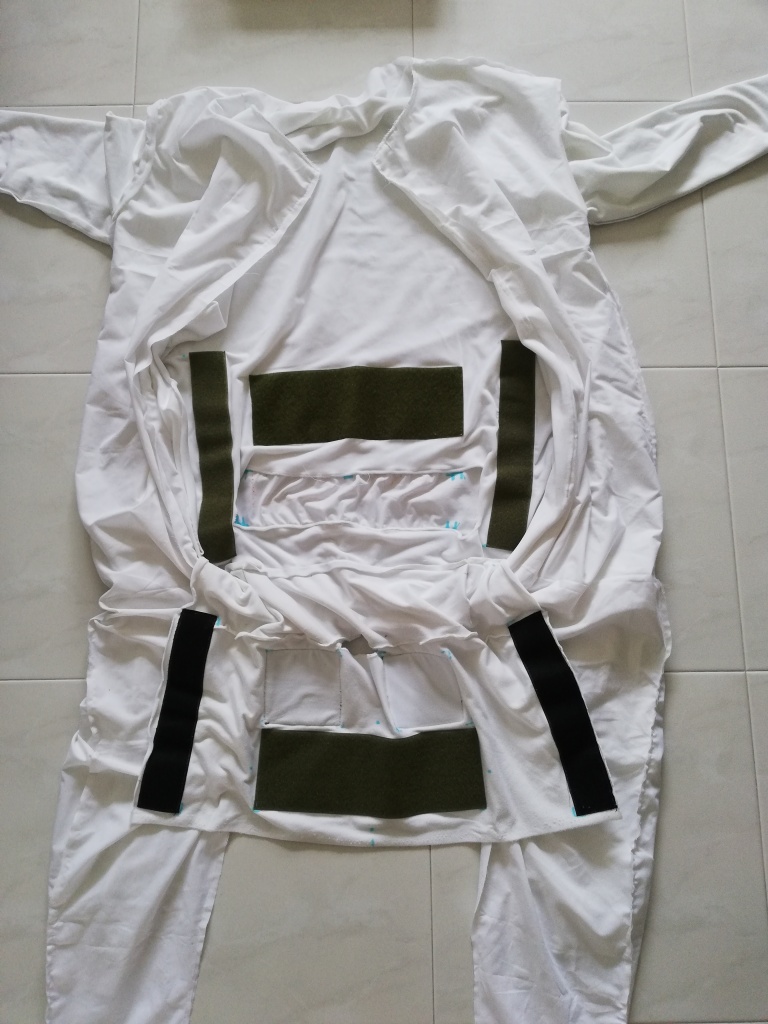
Picture 11: Inner layer of bodysuit constructed, with Velcro patches to mount the ventilator module in place.
Most fursuit bodysuits would only use a single layer of faux fur or fabric to improve breathability. However, with the use of this ventilator module, a specific problem would arise. If the materials used on the front and back of the bodysuits were very breathable, air being injected into the suit through the ventilator would get flushed straight out the back, without the opportunity to cycle around the rest of the body. Additionally, a single layer of faux fur would not provide sufficient support for mounting the ventilator to the suit.
To overcome these issues, an additional thicker layer of fleece fabric was sewn in under the layer of faux fur. However, this layer of thick fleece only extends to the shoulders and hips, without extending to the arms or legs. The purpose of doing this was to make the arm and leg regions more breathable so that the air injected into the suit would circulate around the back and front of the suiter’s body before being flushed out through the limbs. This additional layer also acted as an enhanced support for the mounting of the ventilator inside the suit.
With the ventilator module securely mounted to the rear of the bodysuit, a front flap (shown as opened in the image below) must be flipped up to wrap around and cover it. This is to ensure the proper flow of incoming air, and proper distribution of the stresses on the material caused by the suiter’s movement. At the time of mounting, the Velcro patches should be pressed flat against each other with minimal gaps as much as possible, to prevent the recycling of air within the bodysuit.

Picture 12: Inner layer of bodysuit with ventilator module mounted. Note that the bottom flap is left open here but must be folded upwards for proper operation. Also note that the tubes which deliver air to the arms were eventually removed by the final prototype.
Tail Mounting Attachment
With the ventilator module installed, a additional problem arose as to how the fursuit tail was to be mounted. Traditionally, fursuiters would wear belts around their waists and attach their fursuit tails to them during belt loops. However, the ventilator’s position at the lower back prevents the use of a belt entirely for attaching a tail to.
The solution was to make a similar mounting and attachment system for the tail as was made for the ventilator module. A makeshift loop holder was used that was first inserted into the belt loops of the tail, before being Velcro down to the base of the ventilator module. Large Velcro patches were used to increase the strength of the tail attachment grip. In this manner, the strain of the tail’s weight is distributed to the ventilator and its harness which the suiter is wearing.
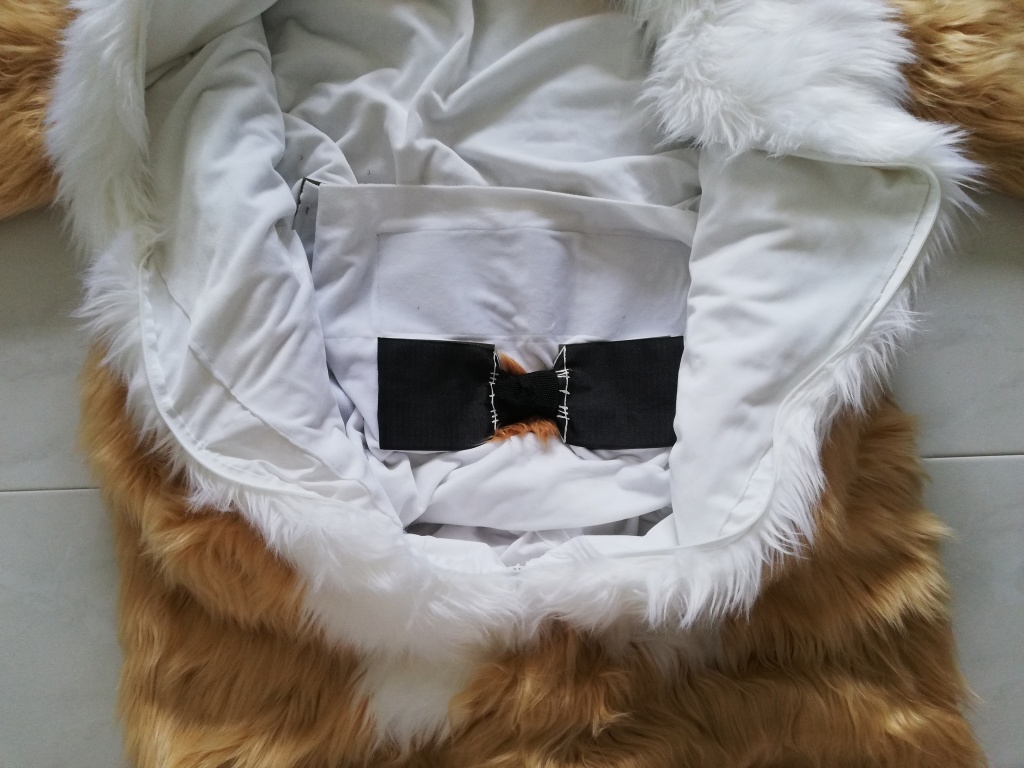
Picture 13: Outer layer of fursuit sewn together with the inner layer. Note the tail mount attachment system indicated by the black coloured bow shaped Velcro patch in the middle.

Picture 14: Completed bodysuit with ventilator module mounted. Note that the temperature and humidity monitoring sensors have not yet been installed in this setup.

Picture 15: The opening of the intake vent for the ventilator module, located just above the tail at the lower back region of the fursuit.
The above picture shows the underside of the ventilator inlet opening, where surrounding air is sucked into the bodysuit. The opening is small enough to be concealed by the fur once it is brushed, and yet large enough to accommodate a significantly high volume of airflow. A filter installed at the ventilator inlet prevents fur from entering the fans, and must be cleaned after each suiting run.
The tail is also velcro mounted to the bodysuit behind the ventilator velcro mount and does not require attachment to a belt loop. Stresses from the weight of the tail are transferred to the ventilator’s harness worn by the suiter.
Picture 16: Wearing of the ventilator module harness inside the suit.
The above picture shows the position of the ventilator relative to the suiter’s body and the bodysuit when worn. Although not visible in this photo, there exists a small opening along the side of the suiter’s right hip for a wire to stick out. This opening also uses velcro mounting patches to secure anything running through it while keeping the rest of the hole closed. In all, the entire bodysuit with the ventilator mounted inside is approximately 3kg.
With the ventilator pushing in air to the back of your bodysuit and into your head, the air is forced around your body and the lower half of your head, evenly removing heat, humidity from perspiration and body odors, before flushing them out through the bodysuit material and the head muzzle respectively. The faster and more evenly distributed dissipation of heat, especially in the head, paired with the more effective drying of perspiration not only provides a more comfortable suiting experience, prevents the buildup of body odors, requiring less harsh a cleaning session when the suiting is over.

Picture 17: Velcro patches at the lower back of the fursuit head help it to stay attached to the air delivery tubes protruding from the suiter’s back inside the bodysuit.
Between the head and the bodysuit are a set of tubes which carry some of the air into the head for cooling, drying and ventilation. However, one problem I encountered was that when the suiter bowed their head down, the tubes could end up jutting out the back and had to be manually reinserted. To avoid this problem, I used a set of Velcro patches on the edge of the air tubes and the back of the fursuit head for mounting together. Being held together with Velcro overcomes this issue, ensuring that the suiter will receive continuous airflow into the head.
This ventilator cooling system works passively by making use of the surrounding air. For this reason, it is most effective when operated in air-conditioned spaces, such as the convention floor. However, even in non-air-conditioned spaces, it is still able to significantly mitigate the extent to which the suiter feels hot or very humid, providing for a more comfortable suiting experience overall.
Rear View Appearance
When worn, the ventilator module is subtly camouflaged by the fur on the back of the fursuit. A rectangular opening just above the tail allows for air to be drawn in from the surroundings into the suit. Another small opening on the right side of the suiter’s hip (not shown in image below) allows for the electrical cables to run from the inside to the outside of the suit.
Picture 18: Rear view appearance of fursuit with ventilator module mounted inside at the region of the lower back within the bodysuit.
External Controller and Battery Module
It soon became obvious that simply attaching a battery to the fan array directly would not suffice to provide adequate cooling or ventilation to the suiter, as many environmental factors could not be monitored or regulated. Additionally, it was not feasible to mount large or multiple batteries inside the suit, from both a convenience and safety point of view. Thus, I decided to build a sort of docking station which would house both the controller for the fursuit ventilator module as well as the batteries needed to power them.
Battery and Charger Types and Safety
After considering various battery chemistries, I decided to go with the lithium iron phosphate battery (LiFePO4). This LiFePO4 battery should not be confused with another type of lithium cobalt oxide (LiCO) battery, the latter of which is commonly found in most mobile devices and laptop computers. LiFePO4 batteries have a higher energy density than a lead acid battery, while being less volatile than a LiCO battery, achieving a decent balance between energy density and safety for this application.
The LiFEPO4 batteries I chose for this application come with built-in charging and discharging controllers, like their LiCO counterparts. These controllers regulate the charging and discharging voltage and currents of the battery to ensure that they are operating within normal range. Should anything abnormal be detected, the controller will shut down the battery pack until the problem is resolved. For example, the controller will shut down the LiFEPO4 battery pack when it is flat to prevent over-discharging, which can damage the battery.
Similarly, the charger chosen for those LiFEPO4 batteries comes with its own built-in charging controller to ensure the safe charging of the batteries. Analogue charging indicator meters are also included for the manual monitoring of charging of the individual batteries to detect any abnormalities. During normal operation, the battery can be considered fully charged when the current (ampere) meter needle drops to zero.
Controller Types
To monitor the power consumption, I used a power monitoring device capable of tracking the voltage, current and cumulative power consumed. This allows the handler to monitor the power consumption of the load at various configurations and determine if the batteries are performing normally. It also comes with a low battery indicator so that the fursuiter’s handler knows when to prepare to change the battery or to return to the headless lounge.
To monitor the health of the suiter, I decided to mount sensors inside the fursuit to monitor the suiter’s temperature and humidity levels. The temperature and humidity controller would monitor those metrics and increase the fan speed and airflow rates automatically if those values exceed their safe thresholds. These thresholds can be set by the suiter beforehand.
To regulate the fan speed, I made use of a digital pulse width modulated speed controller. I had set it to range from a value of 20% to 100%, incrementing or decrementing in steps of 5%. It works by controlling what proportion of the incoming power is allowed to pass through to the output, giving very precise control to the fan speed as compared to an analogue control knob.
Power Modes
The option of having different power modes was to accommodate the wide range of scenarios that one might encounter while using the fursuit ventilator. The power saving mode can be used to prolong the battery life when the battery is running low. It can also be used if the suiter is alright with having a lesser extent of cooling but wants the battery to last for as long as possible throughout the day. In power saving mode, the battery’s current voltage is the maximum voltage that the fan array in the ventilator can operate at.
The performance mode allows the handler to increase the voltage supplied to the fan array to be higher than what is supplied by the battery. This is achieved using a heavy-duty voltage booster module contained within the system. Doing so allows for enhanced cooling for the suiter. The exact maximum boost voltage can be set on the booster module, but it should not exceed the maximum voltage that the fan array load is able to handle. However, operating in performance mode will reduce the battery’s running time by some degree depending on the exact fan speed that was set.
Electrical Safety
To ensure the safety of the system, I installed safety devices into it. A circuit breaker exists immediately after each battery in the event of a malfunction during use or charging. Reverse polarity protection is included to prevent accidental connection of wrong battery or charger polarity. The batteries, chargers and voltage booster modules used all contain the required protection circuits that will shut down their respective components if their safe thresholds are breached. Thicker wires and larger electrical components were used in the system’s construction to better handle higher loads and electrical currents.
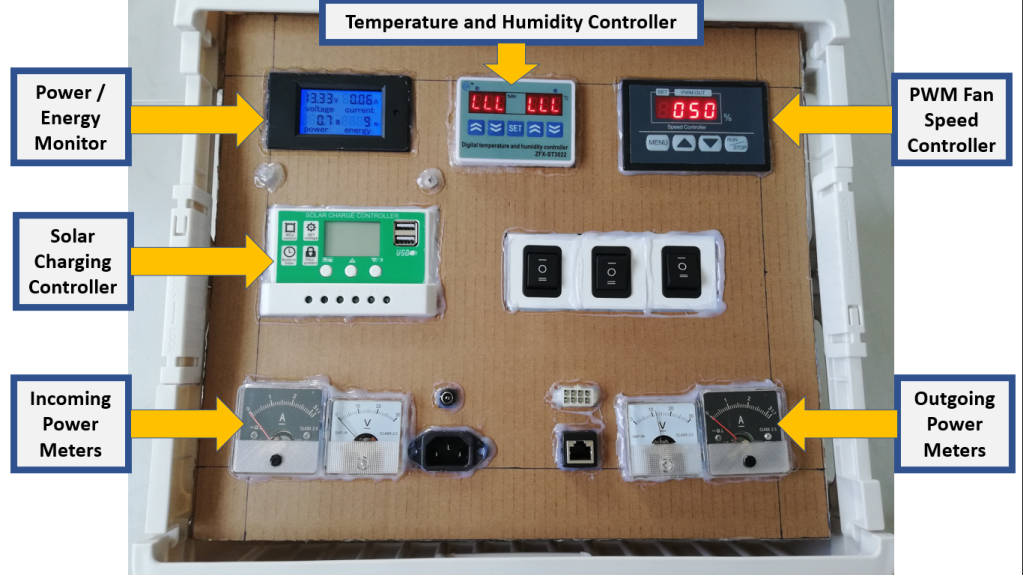
Picture 19: Fursuit ventilator controller and battery module controls (part 1).

Picture 20: Fursuit ventilator controller and battery module controls (part 2).
The above two images show the controller and battery module in the form of a docking station, which have been built into a portable shopping trolley for ease of moving around. This docking station will be connected to the fursuit via a couple of cables to deliver power and receive feedback data from temperature and humidity sensors inside the fursuit. As an added extension, I have also included the ability to recharge using solar energy, as well as voltage and current meters to monitor the power flow and battery capacity during charging and use. The various controls have been labeled for reference.
System Features
This controller and battery system incorporates the following features:
- Charging and discharging isolation (to prevent any incidents arising from recharging the battery while it is in use).
- Power monitoring to monitor the state and current remaining charge in the battery.
- Configurable temperature and humidity monitoring for the suiter using sensors mounted inside the fursuit.
- Configurable pulse width modulated fan speed controller for precise control of airflow rates inside the suit.
- Power saving mode for stretching battery life, best used in air-conditioned spaces or when the battery is low.
- High performance mode for enhanced cooling, best used when outdoors.
- Meters to monitor the voltages and currents flowing into or out of the system to detect abnormalities.
- Ability to recharge from solar energy when roaming outdoors (requires external 12-volt solar panel).
- Low battery indicator to warn fursuit handler when the vbattery is going ot be exhausted.
- Alarm indicator if the suiter’s temperature or humidity levels are too high.
Mounting Spectacles Inside Fursuit Head
The vision inside a fursuit head is already impaired by the mesh of the fursuit eyes. As I myself have shortsightedness, I am partially blind without my spectacles. As I was unable to wear on my fursuit head while also wearing my spectacles, I devised a way to install my old pair into the fursuit head so that I could continue to have clear sight while fursuiting.
I first disassembled and removed the two sides of the spectacle frame that ran along my ears, leaving only the lenses portion with its frame. I hot glued a Velcro patch to the middle of both lenses, and hot glued another patch inside the fursuit head between the eye meshes. In this way, my old spectacles can be mounted inside the fursuit head with some degree of adjustability. It can also be removed for cleaning or changing when required.
I understand that there are concerns with using cardboard on the inside of a fursuit head. However, due to the constant flow of air through the fursuit head provided by the ventilator module, humidity is unable to build up and the pair of glasses do not turn foggy, even after fursuiting for over a hour. Furthermore, as the pair of glasses are attached by a Velcro mount, they can be easily removed for cleaning or changing servicing whenever necessary.
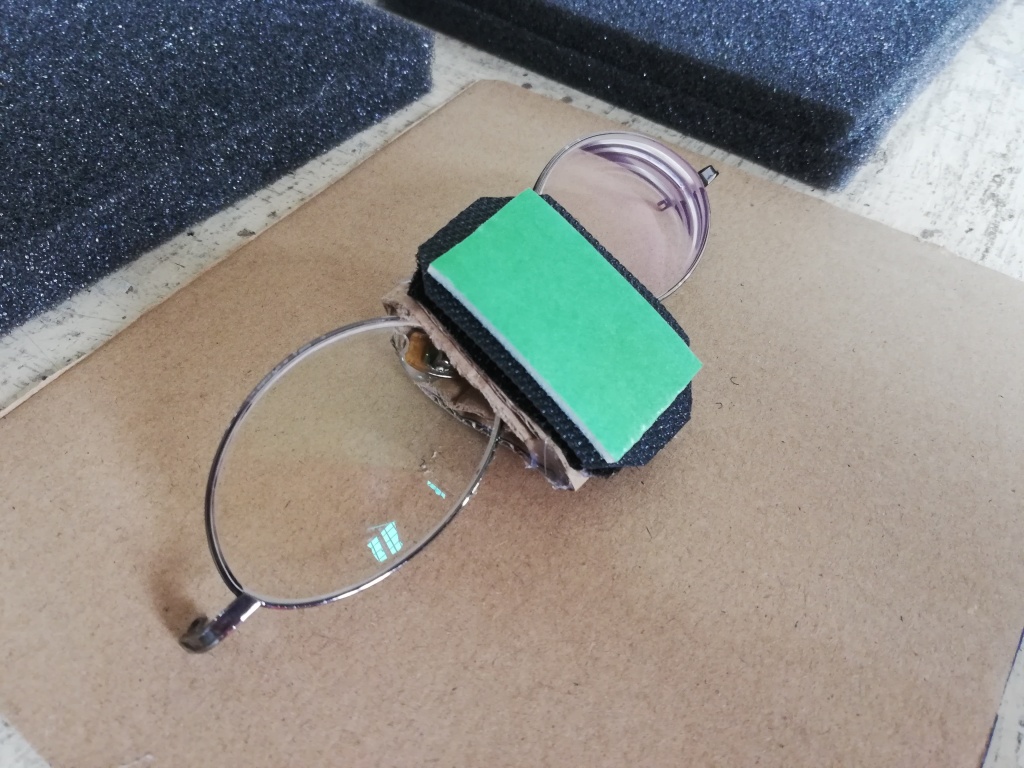
Picture 21: Mounting of my old pair of spectacle lenses to a Velcro patch for mounting inside the fursuit head behind the eye meshes.
Drying of Fursuit Head After Suiting
One of the key things I had to note for my fursuit head was that it cannot be hand washed. As such, I would need to take early steps to dry and clean it to prevent the buildup of odours, mold or bacteria. While an isopropyl solution can help, being able to dry the inside of the fursuit head ultimately proves to be the most important. While the battery and controller module are required during fursuiting, I wanted to make them useful for drying the fursuit head after fursuiting, before packing everything up for the day.
As such, I built a simple and separate fan that can be connected directly to the power connector of the docking station, drawing power from its battery for drying the inside of the fursuit head and the bodysuit. The diameter of the fan nicely fits the opening of the fursuit head, and stale air and moisture is evaporated and flushed out through the mouth opening and the mesh of the eyes. The fan can be left on top of the fursuit head for as long as required to ensure the inside of the head is dry before keeping it.
Benefits
Some of the benefits of using this fursuit ventilation cooling system include, but are not limited to:
- Cool multiple regions of suiter’s body that produces the most heat, including some portion of the head.
- Evenly distributed cooling across most of the body.
- Prevention and removal of humidity buildup by quickly evaporating prespiration.
- Prevention and removal of body odour buildup by flushing air through the suit.
- Prevents glasses worn inside in fursuit head from fogging up too frequently.
- Provides the suiter with a constant supply for fresh air through ventilation.
- Adjustable fan speed through PWM controller.
- Adjustable temperature and humidity thresholds through controller.
- Automatic increase in fan speed and airflow if controller detects that suiter’s heat or humidity threshold is exceeded.
- Fursuit handler only needs to swap battery when it is exhausted, no need to return to headless lounge.
- Ventilator module harness and velcro mounting system are customizable to suiter’s height and size.
- Suiter does not need to wear additional layers under the suit.
- Ease of mounting and dismounting of ventilator module from the suit for cleaning or servicing.
Limitations
Alongside these benefits, there are some limitations to note when using this fursuit ventilator cooling system prototype. These will be improved on subsequently in potential future variants:
- A handler is needed for wearing on or taking off this suit, at least for this current prototype.
- Handler must bring the controller and battery module built into the portable trolley around with the fursuiter at all times.
- Some restrictions on the possible movements that can be performed when wearing this prototype.
- Ventilator module must be dismounted before washing the bodysuit, and then remounted after washing and drying it.
Setbacks
To assess the effectiveness of the fursuit ventilator cooling system on different people, I had a couple of my friend’s kindly volunteer to try it on. Each of them wore it on a couple of occasions for a period of about half an hour to an hour each time. They then kindly provided their feedback on its performance for them, which led me to make a couple of important discoveries myself. Two factors play a key role in determining whether this system can provide sufficiently effective cooling and ventilation to a particular suiter.
The first is the suiter’s metabolic rate. A person with a higher metabolic rate tends to dispel more body heat as compared to another with a lower metabolic rate. If the person’s body is dispersing heat faster than the ventilator system can remove it, heat build-up still occurs, although at a slower rate, eventually still leading to discomfort and potential heat injury.
The main issue with this first point is that my own body has a low metabolic rate. I have often observed that after doing exercises in warm weather, my attire would often still be dry to the touch after the session. Since I had designed and built this cooling and ventilation system based on my own body, the system is only designed to remove as much heat as my body can produce, which is not as much as what many other people’s bodies are producing.
The second is the shape and size of the suiter’s body and head. Each suit is custom made to the body and head shape and size of the person who commissioned it. Because of this, the aerodynamics and airflow within the suit are only optimal when the owner of the suit wears it. The aerodynamics present when a person of a different body build wears the suit may be worse and could impair the system’s ability to provide sufficient cooling and ventilation. Despite this, having some degree of cooling, though not optimal, is better than having no cooling at all.
Proposed Solutions
It may be possible that if we use another person with a high metabolic rate as a baseline and construct a suit around that person, the optimal aerodynamics will allow that person to enjoy a safe and comfortable fursuiting experience. However, the rule of each suit being optimal only for its owner still applies, and as such we cannot adopt a one size fits all strategy when developing such suits and systems together.
Future works include devising a way to incorporate the battery and controllers into the suit in some manner, though I currently have no clear way of achieving this in light of potential safety issues.
Final Prototype
The finished prototype is as shown below. The trolley will have to be brought around with the fursuiter by the suiter’s handler, you will also be monitoring the system’s metrics for the environment inside the fursuit, and adjust them according to the suiter’s preferences. It should be noted that this prototype is currently not ready for production. Please also note that this ventilation and cooling system is not a substitute for keeping hydrated. The suiter should continue to hydrate themselves regularly at frequent intervals while suiting.
The materials used may not be of superior quality to stand up to long term heavy use, though that remains to be seen eventually. This project was carried out with the intention of showing that there are other avenues for tackling the problem of heat injury in fursuits, while showing the potential that such a machine assisted ventilation and cooling system can provide. Thank you for reading this, and I hope it has in some way inspired you to pursue your ideas.

Picture 22: Another view of the current prototype, at least for now. Further improvements may be made to it subsequently, or a new and better version might be created altogether.
